Picture
SUPER JUICE
  • About The Game
  • About The Game Maker
  • Newsletter

Anatomy of a Game Making Studio

9/16/2021

0 Comments

 
Setting up a video game making studio is very much a personal preference thing. Some items are mandatory and some are purely to taste. Allow me give you the rundown of what mine looks like.
Picture
  1. You might need something to look at when you're zoning out (or coming up with a coding solution). This Wizard of Oz inspired artwork is painted by lovely wife, Liese Chavez.
  2. The second monitor is a 25 inch Dell Ultra Sharp. Those extra pixels make the difference!
  3. My laptop is an Acer Nitro 5. It's great for a graphically midrange game (for 2021), but the special thing about it is the solid state hard drive. It speeds things up almost as much as more ram and fast processors do. I use the screen on it primarily to see files that I use for the project, and to look up stuff online when I'm stuck on a problem.
  4. My headphones are Samson Studio Reference, SR850s. Eh, they're alright for my project. I would recommend something else if you need to block out sounds around you.
  5. Notes! I make tons of notes of things I do each day on the project. This practice is helpful if you have a poor memory, as I do.
  6. The desk has a motor that adjusts the height from a sitting position to a standing one (I'm probably standing as you read this).
0 Comments

Flying Saucers

9/8/2021

0 Comments

 
I've been meaning to mention this for a long time now: There aren't enough flying saucers in video games. There. Someone had to say it.
​The flying saucer in Message in a Bottle has retractable arms and is prone to starting conversations about out-of-the-way tourism spots. (She intends, some day, to be a sightseeing space ship, despite being too small for it.)
Illustration on Canson Pastel Paper with Derwent and Prismacolor colored pencils. 3D models and animations made in Blender 3D.
0 Comments

Recent Character Studies

8/28/2021

0 Comments

 
Watercolors on 140lbs Fabriano or Arches Cold Press Watercolor Paper. Paint brands used are an assortment. Brushes: Loew Cornell #10 Round and a 1/4 Dagger.
Here are some of the strange and silly characters that will make an appearance in the video game, Message in a Bottle. They range from Mexican wrestling cats to huge hermit crabs who carry Victorian cottages on their backs.

RSS Feed

0 Comments

Building Video Game Characters

8/18/2021

0 Comments

 
Sketched on toned Canson pastel paper with Prismacolor and Derwent colored pencils. Construction and animations made in Blender 3D.
Alex is the main character in Message in a Bottle. She's a person with tons of anxieties, but tends to put forward a no-care attitude as a defense mechanism. With that in mind, my original sketch gave her running shoes, sporty shorts and a hairstyle to match. After the model was constructed in Blender 3D, I played around with colors until I found a combination that looked good.

RSS Feed

0 Comments

Scripting is not Art *

8/8/2021

0 Comments

 
Picture
I've got a lot of visual art creation under my belt. I mean a lot. Over twenty years of it! I didn't realize how much I'd miss the physical act of making art when I started putting together the nuts and bolts of the game systems about two months ago.

Scripting (coding) is the main tool used for making game logic (if this happens, then this happens (unless  this  is happening)). It's all very complicated and, to me at least, feels more like accounting than creating art.
I'm totally looking forward for this part of the process to be over!

*There are others who use code like a sculptor uses clay or stone. How I envy you.
Progress Report:
Message in a Bottle,
Game Demo 60% Complete,
Scripting 70% Complete!

RSS Feed

0 Comments

How to LOD using Blender and Unity

8/1/2021

0 Comments

 
Beginner Tutorial,
Blender 2.8+
Unity 19.4+
Hi Everyone!
Today I'll walk you through making LODs for use in Unity.

What is an LOD?
LOD stands for Level Of Detail. Basically it's an object that has a lot of detail (triangles) while viewed close up, and very little detail when viewed from a distance. Most 3D video games you've played use LODs to save on processing power. Here's one way you can do it:


1. Open Blender 3D. Navigate to Object Mode and select your object you'd like to make an LOD for.
2. Make a few copies of it.
*Unity allows you to have tons of LOD levels, but keep in mind that each object you have in the scene will increase size of the game build.
Picture
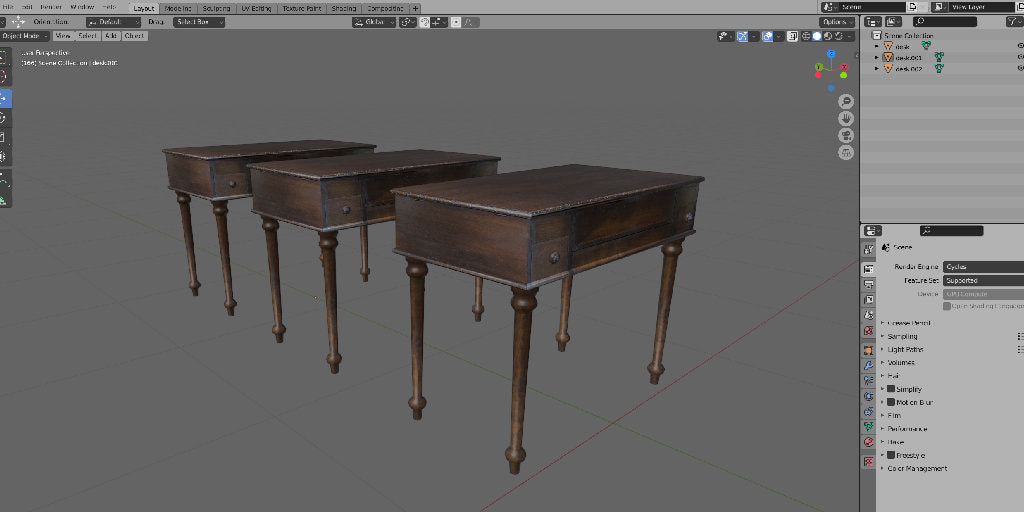
3. Select the 2nd copy of your object, then navigate to the modifiers tab on the right. Select the modifier Decimate.
Check the box for Triangulate. Blender behaves better with quads, but Unity triangulates everything that is imported, so you might as well see what that looks like now.
Lower the ratio slider until you're happy with the result.
​Then find the Apply button inside that down arrow (next to the X) and apply your changes.
4. Do the same thing to the rest of your copies, being sure to make them have less and less triangles as you go.
Picture
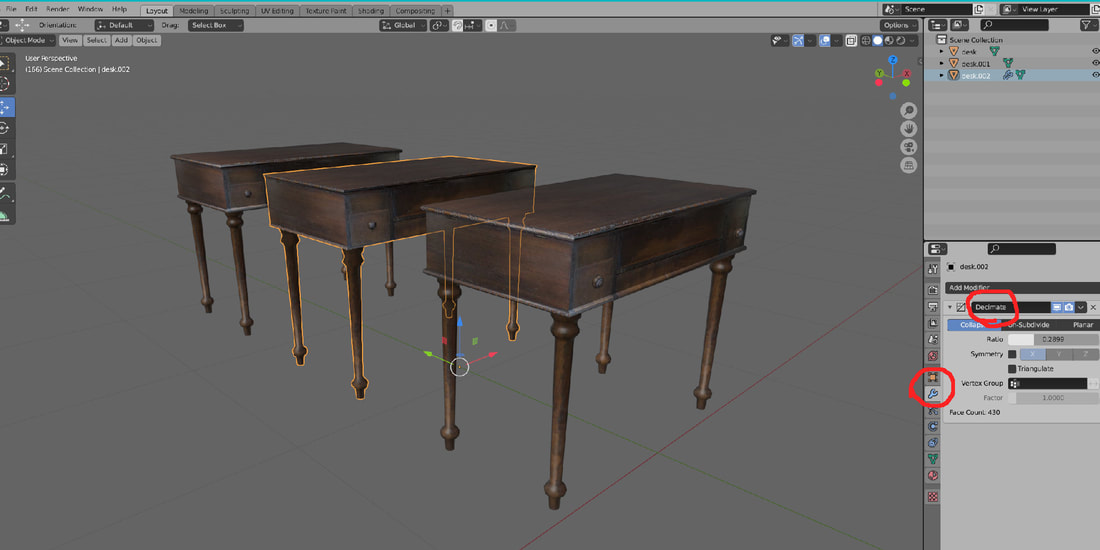
5. Select the first object alone. The undecimated base object.
Choose "export as FBX" in File at the top left of the screen. Choose where you'd like to export to and name your file something that will indicate where it goes in the LOD hierarchy.
The important export options here are the Transform ones. For Unity, Scale should be 1 and Y is Up.

Picture
6. Import the textures first by dragging them into your Project box where you'd like them, and use them to make a material.
Then drag your FBXs into the Project box wherever you'd like them. Put your material where it should go by selecting the objects and using the Inspector (find the Materials Tab).
Next, select all of your imported objects at the same time and drag them into the Hierarchy. This usually makes them all occupy the same location. If it doesn't, adjust their locations in the Inspector so that they do.
If they show up as prefabs, like you see that mine do, unpack them by right clicking on them in the Hierarchy and selecting Unpack Completely.
Picture
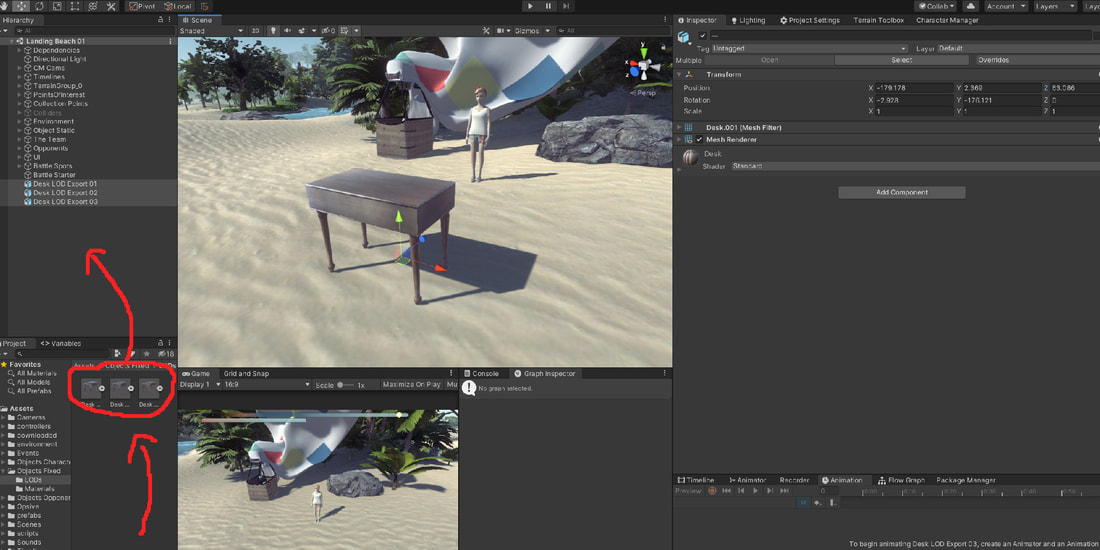
7. After that, select your object with the most detail and, in the Inspector, Add Component: LOD Group.
8. Drag your objects from the Hierarchy into the LOD spots in the Inspector. The first spot should be occupied by your most detailed model, and so on. *If you have more than 3 objects to add to the LOD Group, right click on one of the LOD levels in the LOD Group to insert them.
A window will pop up asking if you'd like to reparent. Go ahead and do that.

And that's it!
You can adjust the distances in which the LODs kick in by grabbing and dragging the spots in between where they are housed in the Inspector.
Picture

RSS Feed

0 Comments

Taking in the Scenery

7/28/2021

0 Comments

 
Game Demo 50%,
Overall Game 10%,
​Unity , Terrain
The terrain for the demo portion of the game is 100% complete!
​Ok, that's not completely correct. There is a term called "borrowed scenery" that I particularly like. Borrowed scenery, in the context of a video game, are areas that you can see in the background, but can't approach with the player character. Objects like far away buildings or city skylines can be borrowed scenery. In Message in a Bottle, borrowed scenery are things like distant mountains, islands and flying saucers.
Picture
Picture
Picture

RSS Feed

0 Comments

The Thief of Un-Important Items

7/22/2021

0 Comments

 
Sketched on toned Canson pastel paper with  Prismacolor and Derwent colored pencils. Construction and animations made in Blender 3D.
This creature goes by the name MeGuana. He likes lounging in the sun and also bright shiny objects. He won't think twice about steeling your earrings or sun-glasses, so watch out!
Picture
Picture

RSS Feed

0 Comments

Traditional or Visual Scripting? A (Not-So) Tough Decision.

7/15/2021

0 Comments

 
Game Demo 50% complete,
Game  Overall 10%,
​Unity, Bolt Visual Scripting

A few weeks ago I hit a road-block in game construction. I needed to add some actual functionality. Running around a pretty environment is great, but that alone doesn't make a game (Okay, there're some games where you only run).
​
My choices were to learn traditional scripting, or visual scripting. Here's the difference, as I see it:

Traditional scripting is like learning a new language, complete with new syntax, context and grammar. And you have to be so accurate. Every line has a function and every word on that line has to be spelled, cased and spaced correctly. Otherwise you have errors. Here is what it looks like:
"using System.Collections;
using System.Collections.Generic;
using UnityEngine;
using UnityEngine.SceneManagement;
public class menu : MonoBehaviour
{
    public void PlayGame ()
    {
        SceneManager.LoadScene(SceneManager.GetActiveScene().buildIndex + 1);
    }
    public void QuitGame()
    {
        Debug.Log("Quit!");
    Application.Quit();
    }
}"

That was the first and only code I ever scripted. All it really says is when to load the game and when to exit.

Visual scripting, on the other hand seems to be perfectly made for people who have a visual arts background, like myself. Here's what it looks like:
Picture
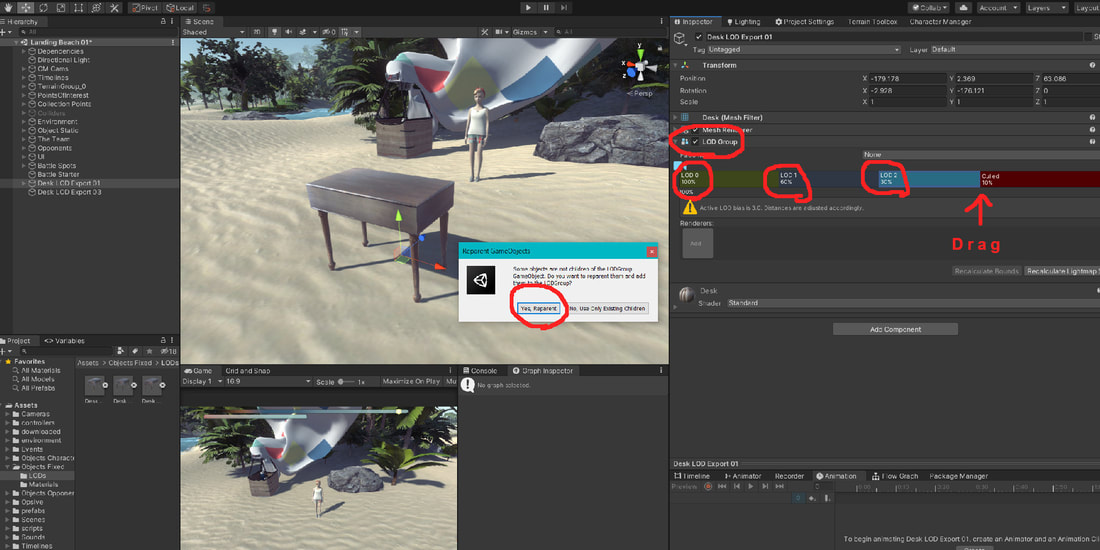
This example does the same exact thing as the other example.
I put them together here so you can see the comparison, but keep in mind that you wouldn't put game start and game quit side by side as you see them here. They should be in separate bolt flow charts, attached to different UI or buttons.

Obviously I am biased toward Visual Scripting. If you're just starting out with coding and have no problem learning new languages, then you probably should give traditional scripting a go. Otherwise, I recommend visual scripting.

RSS Feed

0 Comments

Unity Tutorial: Trigger a Timeline with Bolt Visual Scripting

7/11/2021

0 Comments

 
Beginner Tutorial
Unity 19.4+, Bolt Visual Scripting 1.4.15+
* This tutorial assumes you have a basic understanding of Unity, Bolt Visual Scripting and know how to make a Timeline.
If you're not a programmer and you're just learning Unity or Bolt, everything can seem pretty daunting. This isn't one of those daunting things, though. Let me walk you through the steps.
​

​Setting things up:
1. Choose your Timeline in the Hierarchy. Then set it to
Play On Awake. Next, make the Timeline Inactive by unchecking the box at the top of the Inspector.
Picture
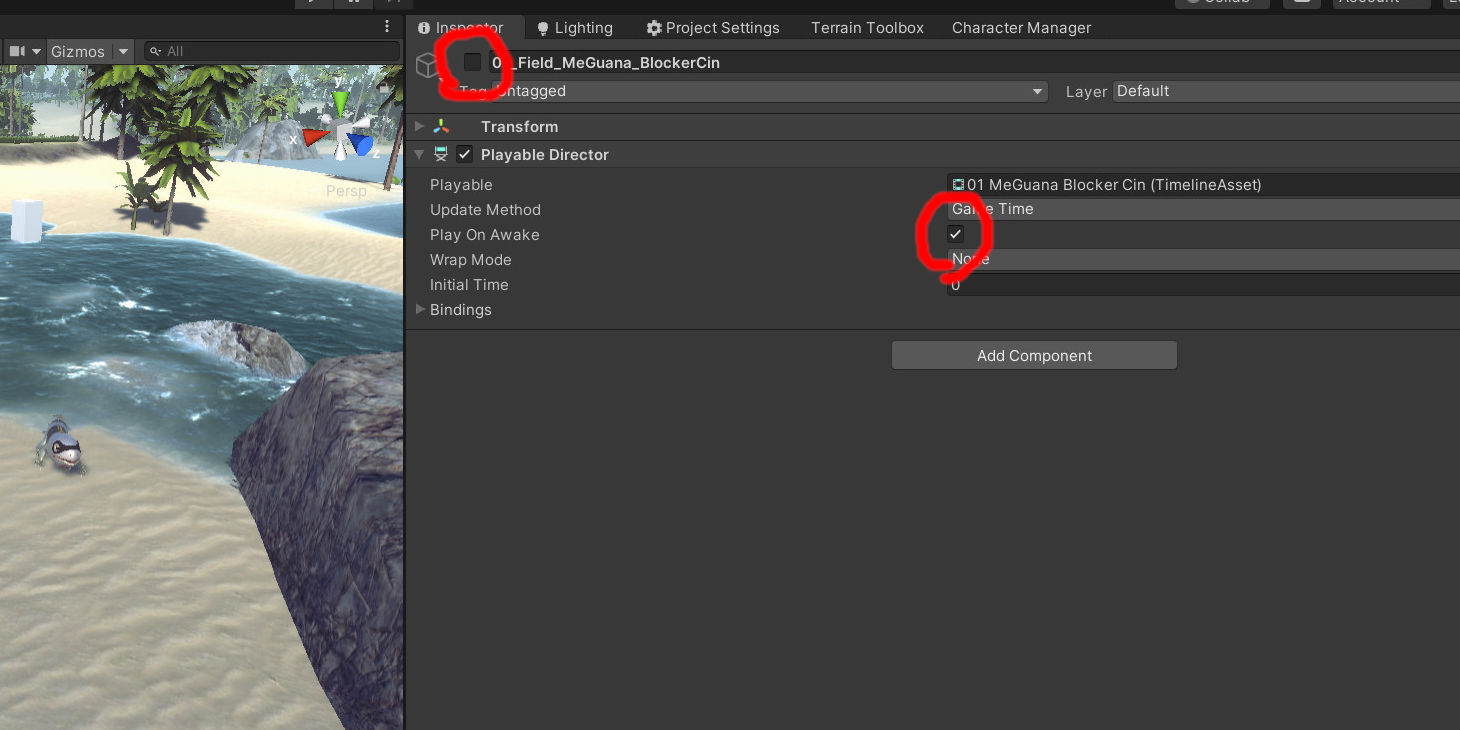
2. Then, attach a Collider to an object in your scene that you want to be the trigger for the timeline, and check the box that says Is Trigger.
Picture
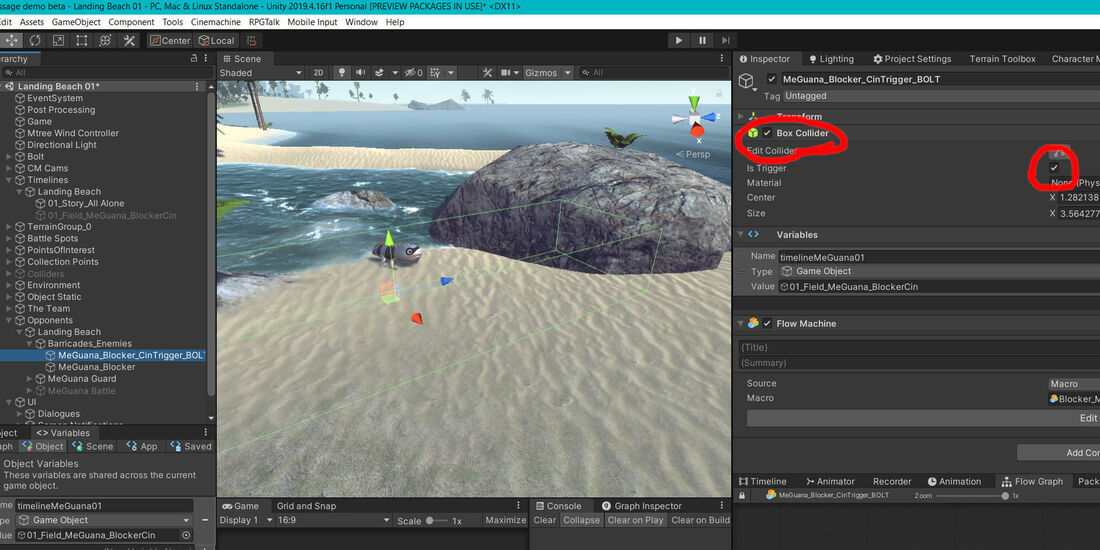
The Bolt Visual Scripting Component:
3. Next, add the
Flow Machine component to the same object that your Collider resides in and click the New button save it as a macro into your project files.
4. Make an Object Variable and set the Type to Game Object. Drag your Timeline from the Hierarchy into the Variable's Value Field.
5. Drag that Variable you just created into the Flow Graph and use the Fuzzy Finder to add an On Trigger Enter and a Set Active Game Object (check the Boolean to True).
6. Hook all those nodes up the way you see in the picture, and that's it. Good job! Now when your player character-or-whatever runs into the collider, your timeline will trigger.
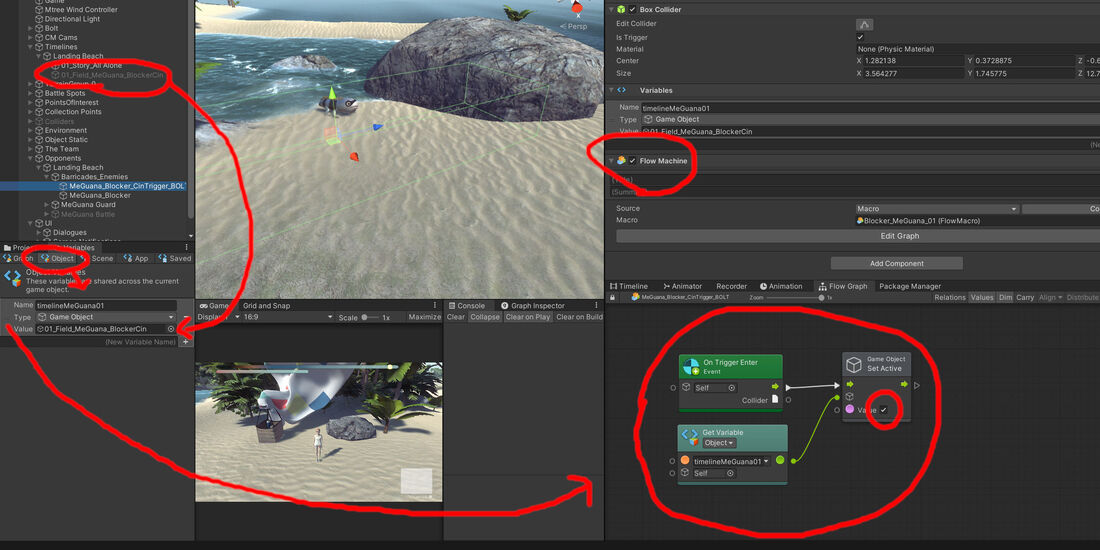
Picture

RSS Feed

0 Comments
<<Previous
Forward>>

    DevLog

    Follow along as Super Juice constructs a Strategy RPG

    Kris Chavez

    Artist, Author, Indy Game Designer, Happy Husband, Half Robot, Three Quarters Cat

    Archives

    May 2022
    April 2022
    February 2022
    January 2022
    December 2021
    November 2021
    October 2021
    September 2021
    August 2021
    July 2021

    Categories

    All
    Concept To Completion
    Game Progress
    Tutorials

    RSS Feed

copyright  Super Juice Games 2025   [email protected]
  • About The Game
  • About The Game Maker
  • Newsletter